Latest Products
Showing posts with label BLOGGER TIPS. Show all posts
Install GooglePlus Comments Widget on custom Blogger Templates

Install GooglePlus Comments Widget on custom Blogger Templates


Blogger recently implemented Google Plus comments on their Blogger platform, and we know that many bloggers like you have gone ahead and implemented this new functionality to your blogger blogs. But a lot of our readers have been asking us how to add Google Plus comments, or Google Plus comments API  to Blogger custom templates? This feature turns on and off smoothly for default templates. But most bloggers don't use default templates. For them, we have compiled this short tutorial on how to implement Google Plus commenting system on custom Blogger Templates.

Why enable Google Plus comments?

Google Plus comments are much more flexible, and allow you to keep track of your conversations better. They also help keep the discussions organized. Besides, readers canshare their comments, or make comments on your Google Plus posts to make them appear on your blog. This expands your reach as your followers' extended circles can see your content too.

Although there's some controversy regarding the usefulness of this commenting system versus the harms (something we discussed at length in our last post), the choice is really yours. But if you do want to implement this feature on your custom Blogger templates, then here's how you can do that.

Google Plus comments

Enabling Google Plus comments

To start off, first log into your Blogger account, and click on the blog you want to add Google Plus comments to. Now, click on the Google+ option on the left sidebar. You must be the admin of a blog to be able to view this option.

Now, you need to upgrade our account, and integrate it with Google Plus if you haven't already done so. You will get a "Get Started" button if you haven't. Follow the simple instructions, and then move on to the next step.

Check the option that says Use Google+ Comments on this Blog - For default templates, this is pretty much all you need to do.
Enable Google Plus comments

For custom templates, here's what you need to do;
  • Click on the Template tab from the left sidebar, and then click on Edit HTML.
  • From the code editor, press Ctrl + F, and search for the following line of code
<div class='comments' id='comments'>
  • Immediate after this line, add the following code.
<div class='cmt_iframe_holder' expr:data-href='data:post.canonicalUrl'expr:data-viewtype=' data:post.viewType'/>
Code

Take care not to make a mistake while editing. And it would be a good idea to backup your template (Backup/Restore option at the top-right), just in case.

For comments to work on custom templates, you need to add the code as well as to enable it


Were you Satisfied? Pls subscribe to our Social Media Pages to stay connected with us. Facebook @1SHORTNOTE. +Aguden Udensi, for Google Plus. You could also get most of our other stuffs like, Digital Advertising, News, Africa News, Tunisia President, Crisis Talks, Funny videos, Dance, Germany dialogue, Crisis in Tunisia, News, Kidnap in Nigeria, Zimbabwe Police, election monitor's office, Tips, conserve your Battery, How to conserve smartphone Battery, Themed Games, iOS, Android, Manage files, Cloud Storage, Android, buy cars in America, Auction cars in America, BBPIN Nigeria, Exchange BB Pins, Get BB Pins of Girls, Pinging, BB Hanging Problem, How to use Apploader, Blackberry Porsche Price in Nigeria, Backup your BB, Track stolen BB, Glo, codes for Glo BIS, Free Apps for BB, Free Apps for Black Berry, How to lock BBM, Pictures, BB Pictures, Blackberry Pictures, Pin Share App for BB, Screen Grabber for BB, BBM Chat, MTN BB service, Airtell, Airtel BIS, Watch DSTV with Blackberry, Nokia Phones, Applications, Social Applications, Mobile Applications, bbmanimated.com, Free BBM Animated Avatars, bloggers guide, Boost Traffic in Blogger, CSS3 in Blogger, Web Design, Audio Player in Blog, Audio player, website, chose Blogging, Guide to BuddyPress, Tips and Resources, Buddy Press, designs, Graphics, facebook tips, facebook updates, wallpapers, Valentine's gift, apps for ipod, Games, PlayStation 4, Kitchen Tools, Gadgets, Cloud Operating System, Free Cloud Operating Systems, PC Tips, Windows Programs, Internet Usage, Cloud Hosting, Backup WhatsApp, Iphone to computer, Repair your PC, Repair your laptop, Tutorials on how to repair your PC yourself, Podcast, seo tools, Publishing, Making money with Affiliate Programs, Free Skype Calls, Sports News, Technology News, Templates, codes, how to create Ajax-Based HTML5, create Gmail logo with CSS3, E-book Readers, E-book Managers, Firefox plugins, how to Protect your computer, CSS Editors, Essential Tools and Applications for Bloggers, Web designing tools, keyboard shortcuts you should know, Table of contents page for Blogger, How to, download tweets, from twitter, Youtube Tutorials, Beginners Guide, and many more...

Blogger recently implemented Google Plus comments on their Blogger platform, and we know that many bloggers like you have gone ahead and implemented this new functionality to your blogger blogs. But a lot of our readers have been asking us how to add Google Plus comments, or Google Plus comments API  to Blogger custom templates? This feature turns on and off smoothly for default templates. But most bloggers don't use default templates. For them, we have compiled this short tutorial on how to implement Google Plus commenting system on custom Blogger Templates.

Why enable Google Plus comments?

Google Plus comments are much more flexible, and allow you to keep track of your conversations better. They also help keep the discussions organized. Besides, readers canshare their comments, or make comments on your Google Plus posts to make them appear on your blog. This expands your reach as your followers' extended circles can see your content too.

Although there's some controversy regarding the usefulness of this commenting system versus the harms (something we discussed at length in our last post), the choice is really yours. But if you do want to implement this feature on your custom Blogger templates, then here's how you can do that.

Google Plus comments

Enabling Google Plus comments

To start off, first log into your Blogger account, and click on the blog you want to add Google Plus comments to. Now, click on the Google+ option on the left sidebar. You must be the admin of a blog to be able to view this option.

Now, you need to upgrade our account, and integrate it with Google Plus if you haven't already done so. You will get a "Get Started" button if you haven't. Follow the simple instructions, and then move on to the next step.

Check the option that says Use Google+ Comments on this Blog - For default templates, this is pretty much all you need to do.
Enable Google Plus comments

For custom templates, here's what you need to do;
  • Click on the Template tab from the left sidebar, and then click on Edit HTML.
  • From the code editor, press Ctrl + F, and search for the following line of code
<div class='comments' id='comments'>
  • Immediate after this line, add the following code.
<div class='cmt_iframe_holder' expr:data-href='data:post.canonicalUrl'expr:data-viewtype=' data:post.viewType'/>
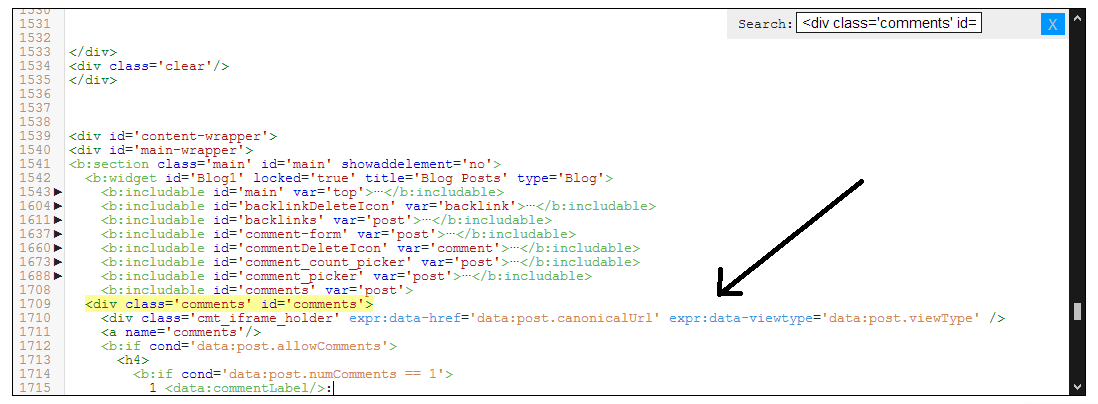
Code

Take care not to make a mistake while editing. And it would be a good idea to backup your template (Backup/Restore option at the top-right), just in case.

For comments to work on custom templates, you need to add the code as well as to enable it


Were you Satisfied? Pls subscribe to our Social Media Pages to stay connected with us. Facebook @1SHORTNOTE. +Aguden Udensi, for Google Plus. You could also get most of our other stuffs like, Digital Advertising, News, Africa News, Tunisia President, Crisis Talks, Funny videos, Dance, Germany dialogue, Crisis in Tunisia, News, Kidnap in Nigeria, Zimbabwe Police, election monitor's office, Tips, conserve your Battery, How to conserve smartphone Battery, Themed Games, iOS, Android, Manage files, Cloud Storage, Android, buy cars in America, Auction cars in America, BBPIN Nigeria, Exchange BB Pins, Get BB Pins of Girls, Pinging, BB Hanging Problem, How to use Apploader, Blackberry Porsche Price in Nigeria, Backup your BB, Track stolen BB, Glo, codes for Glo BIS, Free Apps for BB, Free Apps for Black Berry, How to lock BBM, Pictures, BB Pictures, Blackberry Pictures, Pin Share App for BB, Screen Grabber for BB, BBM Chat, MTN BB service, Airtell, Airtel BIS, Watch DSTV with Blackberry, Nokia Phones, Applications, Social Applications, Mobile Applications, bbmanimated.com, Free BBM Animated Avatars, bloggers guide, Boost Traffic in Blogger, CSS3 in Blogger, Web Design, Audio Player in Blog, Audio player, website, chose Blogging, Guide to BuddyPress, Tips and Resources, Buddy Press, designs, Graphics, facebook tips, facebook updates, wallpapers, Valentine's gift, apps for ipod, Games, PlayStation 4, Kitchen Tools, Gadgets, Cloud Operating System, Free Cloud Operating Systems, PC Tips, Windows Programs, Internet Usage, Cloud Hosting, Backup WhatsApp, Iphone to computer, Repair your PC, Repair your laptop, Tutorials on how to repair your PC yourself, Podcast, seo tools, Publishing, Making money with Affiliate Programs, Free Skype Calls, Sports News, Technology News, Templates, codes, how to create Ajax-Based HTML5, create Gmail logo with CSS3, E-book Readers, E-book Managers, Firefox plugins, how to Protect your computer, CSS Editors, Essential Tools and Applications for Bloggers, Web designing tools, keyboard shortcuts you should know, Table of contents page for Blogger, How to, download tweets, from twitter, Youtube Tutorials, Beginners Guide, and many more...
Install GooglePlus Comments Widget on custom Blogger Templates
https://blogger.googleusercontent.com/img/b/R29vZ2xl/AVvXsEhMB3lxedRCIHdfjRpA60GPAJSWD9YfOvSqHEoKzWYkuJFhHQk9ATd19b36hPLbnM_bNk9muJmYqfs3xO7VjT1sbodaE6lkDBZgoaUly0dvtUywa2iKJJfEjgkaSJaMHSgX8p_SgTQ918Ew/s72-c/google+.jpg
View detail
How to create your First blog - what platform to choose?

How to create your First blog - what platform to choose?

Keep calm and Blog!

Alright. So here's a topic that has been dragged around quite a lot by now. But it never seems to go out of fashion, because every year, more and more people are entering the blogosphere. Recent trends have changed the job-oriented mentalities, and have inspired entrepreneurship. Therefore, it is high time people should start looking into alternative sources of income, or even a productive hobby that can reward them for their time and effort. Hence, in this post, we are going to walk new users through in creating and setting up their first blog, and the platform they should choose.

Is blogging worth it?


That depends on how you see it actually. The key behind blogging is hard work and dedication. Every job needs those two ingredients, but blogging needs them more than anything. If you are willing to give a couple hours or so to your blog every day, 365 days a year, only then can you hope to earn decent pay-checks.

Reward is something that comes later on. So blogging needs determination to wait out that time with all the hard work without hoping for an immediate reward. Tonnes of people fail at blogging simply because they want to 'get rich quick'. Please realize that there is no easy way out. And if you'd rather not invest as much of your time and efforts, then I am afraid blogging isn't for you.


Choosing a platform

This is a very important question you must settle before you move on, because it will ultimately effect your growth. Although there are various blogging platforms available out there, two of the most used and recommended are Blogger and WordPress.

The debate between Blogger and WordPress is a long, and never-ending one. Indeed, different people have different point of views, and different reasons for liking either of the two platforms. The decision, however, ultimately depends upon what sort of a user you are, and what you intend to do with your blog.

Blogger

Blogger is the best option for you if you're a beginner user. It is easy to implement, and the learning curve is a very comfortable one. Blogger is customizable to a great extent, and doesn't need you to have any skill-sets for using it. Anyone can set up a Blogger blog. And best of all, there's little to no investment required. For your blog, you will only need to buy a domain, which is worth $10, give or take a few bucks.
Blogger
Another great thing I like about Blogger is, it is pretty easy to tweak. There's a single template code which you can edit to change the outlook of your blog. And the implementation is pretty clean and efficient too. Blogger is optimized for search engines, and contains easy social integration.

There is, however, a catch. Blogger is limited in the sense that it isn't for programmers. You can not run PHP or ASP scripts on your blog, nor can you fiddle around with a database. There's also a limit to the number of stand-alone pages, and the number of users you can have.

WordPress

WordPress is an extremely powerful open source software that is customizable to a great degree. And best of all, it supports PHP, so it is the number one choice for programmers and web developers. You could create heavily dynamic content or flexible database applications on your WordPress site. Hence, it is preferred by the corporate and business sector, where functionality is the biggest priority.

However, the learning curve is pretty steep. WordPress can be difficult and challenging. Even the slightest of tweaks can take up a lot of time and effort. And since the software is constantly updated, plugins you are using currently might not work well with the next update. Hence, you will end up a lot of time debugging errors and finding solutions.

WordPress

WordPress also requires you to invest a lot of money in it. You have to buy not just a domain, but a hosting as well. And if you want full customization, you will need to buy a framework. So even the start-up investment can reach as high as $150-$300 - let alone on-going investments in hosting renewals, plugin subscriptions, and so on.

(NOTE: There are two types of WordPress blogs. Free (www.yourblog.wordpress.com), and self hosted (www.yourblog.com). Free blogs are hosted on WordPress.com, and are extremely restrictive. They only serve as a demo for self hosted blogs (WordPress.org). In this post, we are talking about self-hosted blogs which are fully customizable, and not free WordPress blogs)

So in essence, between Blogger and WordPress, Blogger is the better option for beginners. WordPress requires a lot of time, effort and resources. But Blogger is totally free (apart from the domain). And it's not like Blogger blogs can't be professional. This very blog is run on Blogger. And you can see for yourself how much customization we have done. So WordPress is best for corporate and business sector websites, whereas Blogger is best for individuals who have little to no development experience. Hence, we would recommend you choose Blogger, and not WordPress.

Creating your first blog

Creating a blogger blog is really simple.
  • Sign in, or register yourself at Blogger.com
  • Once in your dashboard, click on the New Blog button on the left side.
  • Now, you will see a pop up where you will be prompted to enter a Title and Address for your blog. Fill the fields, and then pick a general template.
Create new blog
  • You are now done! You can now start writing great content on your blog. 


Were you Satisfied? Pls subscribe to our Social Media Pages to stay connected with us. Facebook @1SHORTNOTE. +Aguden Udensi, for Google Plus. You could also get most of our other stuffs like, Digital Advertising, News, Africa News, Tunisia President, Crisis Talks, Funny videos, Dance, Germany dialogue, Crisis in Tunisia, News, Kidnap in Nigeria, Zimbabwe Police, election monitor's office, Tips, conserve your Battery, How to conserve smartphone Battery, Themed Games, iOS, Android, Manage files, Cloud Storage, Android, buy cars in America, Auction cars in America, BBPIN Nigeria, Exchange BB Pins, Get BB Pins of Girls, Pinging, BB Hanging Problem, How to use Apploader, Blackberry Porsche Price in Nigeria, Backup your BB, Track stolen BB, Glo, codes for Glo BIS, Free Apps for BB, Free Apps for Black Berry, How to lock BBM, Pictures, BB Pictures, Blackberry Pictures, Pin Share App for BB, Screen Grabber for BB, BBM Chat, MTN BB service, Airtell, Airtel BIS, Watch DSTV with Blackberry, Nokia Phones, Applications, Social Applications, Mobile Applications, bbmanimated.com, Free BBM Animated Avatars, bloggers guide, Boost Traffic in Blogger, CSS3 in Blogger, Web Design, Audio Player in Blog, Audio player, website, chose Blogging, Guide to BuddyPress, Tips and Resources, Buddy Press, designs, Graphics, facebook tips, facebook updates, wallpapers, Valentine's gift, apps for ipod, Games, PlayStation 4, Kitchen Tools, Gadgets, Cloud Operating System, Free Cloud Operating Systems, PC Tips, Windows Programs, Internet Usage, Cloud Hosting, Backup WhatsApp, Iphone to computer, Repair your PC, Repair your laptop, Tutorials on how to repair your PC yourself, Podcast, seo tools, Publishing, Making money with Affiliate Programs, Free Skype Calls, Sports News, Technology News, Templates, codes, how to create Ajax-Based HTML5, create Gmail logo with CSS3, E-book Readers, E-book Managers, Firefox plugins, how to Protect your computer, CSS Editors, Essential Tools and Applications for Bloggers, Web designing tools, keyboard shortcuts you should know, Table of contents page for Blogger, How to, download tweets, from twitter, Youtube Tutorials, Beginners Guide, and many more...
Keep calm and Blog!

Alright. So here's a topic that has been dragged around quite a lot by now. But it never seems to go out of fashion, because every year, more and more people are entering the blogosphere. Recent trends have changed the job-oriented mentalities, and have inspired entrepreneurship. Therefore, it is high time people should start looking into alternative sources of income, or even a productive hobby that can reward them for their time and effort. Hence, in this post, we are going to walk new users through in creating and setting up their first blog, and the platform they should choose.

Is blogging worth it?


That depends on how you see it actually. The key behind blogging is hard work and dedication. Every job needs those two ingredients, but blogging needs them more than anything. If you are willing to give a couple hours or so to your blog every day, 365 days a year, only then can you hope to earn decent pay-checks.

Reward is something that comes later on. So blogging needs determination to wait out that time with all the hard work without hoping for an immediate reward. Tonnes of people fail at blogging simply because they want to 'get rich quick'. Please realize that there is no easy way out. And if you'd rather not invest as much of your time and efforts, then I am afraid blogging isn't for you.


Choosing a platform

This is a very important question you must settle before you move on, because it will ultimately effect your growth. Although there are various blogging platforms available out there, two of the most used and recommended are Blogger and WordPress.

The debate between Blogger and WordPress is a long, and never-ending one. Indeed, different people have different point of views, and different reasons for liking either of the two platforms. The decision, however, ultimately depends upon what sort of a user you are, and what you intend to do with your blog.

Blogger

Blogger is the best option for you if you're a beginner user. It is easy to implement, and the learning curve is a very comfortable one. Blogger is customizable to a great extent, and doesn't need you to have any skill-sets for using it. Anyone can set up a Blogger blog. And best of all, there's little to no investment required. For your blog, you will only need to buy a domain, which is worth $10, give or take a few bucks.
Blogger
Another great thing I like about Blogger is, it is pretty easy to tweak. There's a single template code which you can edit to change the outlook of your blog. And the implementation is pretty clean and efficient too. Blogger is optimized for search engines, and contains easy social integration.

There is, however, a catch. Blogger is limited in the sense that it isn't for programmers. You can not run PHP or ASP scripts on your blog, nor can you fiddle around with a database. There's also a limit to the number of stand-alone pages, and the number of users you can have.

WordPress

WordPress is an extremely powerful open source software that is customizable to a great degree. And best of all, it supports PHP, so it is the number one choice for programmers and web developers. You could create heavily dynamic content or flexible database applications on your WordPress site. Hence, it is preferred by the corporate and business sector, where functionality is the biggest priority.

However, the learning curve is pretty steep. WordPress can be difficult and challenging. Even the slightest of tweaks can take up a lot of time and effort. And since the software is constantly updated, plugins you are using currently might not work well with the next update. Hence, you will end up a lot of time debugging errors and finding solutions.

WordPress

WordPress also requires you to invest a lot of money in it. You have to buy not just a domain, but a hosting as well. And if you want full customization, you will need to buy a framework. So even the start-up investment can reach as high as $150-$300 - let alone on-going investments in hosting renewals, plugin subscriptions, and so on.

(NOTE: There are two types of WordPress blogs. Free (www.yourblog.wordpress.com), and self hosted (www.yourblog.com). Free blogs are hosted on WordPress.com, and are extremely restrictive. They only serve as a demo for self hosted blogs (WordPress.org). In this post, we are talking about self-hosted blogs which are fully customizable, and not free WordPress blogs)

So in essence, between Blogger and WordPress, Blogger is the better option for beginners. WordPress requires a lot of time, effort and resources. But Blogger is totally free (apart from the domain). And it's not like Blogger blogs can't be professional. This very blog is run on Blogger. And you can see for yourself how much customization we have done. So WordPress is best for corporate and business sector websites, whereas Blogger is best for individuals who have little to no development experience. Hence, we would recommend you choose Blogger, and not WordPress.

Creating your first blog

Creating a blogger blog is really simple.
  • Sign in, or register yourself at Blogger.com
  • Once in your dashboard, click on the New Blog button on the left side.
  • Now, you will see a pop up where you will be prompted to enter a Title and Address for your blog. Fill the fields, and then pick a general template.
Create new blog
  • You are now done! You can now start writing great content on your blog. 


Were you Satisfied? Pls subscribe to our Social Media Pages to stay connected with us. Facebook @1SHORTNOTE. +Aguden Udensi, for Google Plus. You could also get most of our other stuffs like, Digital Advertising, News, Africa News, Tunisia President, Crisis Talks, Funny videos, Dance, Germany dialogue, Crisis in Tunisia, News, Kidnap in Nigeria, Zimbabwe Police, election monitor's office, Tips, conserve your Battery, How to conserve smartphone Battery, Themed Games, iOS, Android, Manage files, Cloud Storage, Android, buy cars in America, Auction cars in America, BBPIN Nigeria, Exchange BB Pins, Get BB Pins of Girls, Pinging, BB Hanging Problem, How to use Apploader, Blackberry Porsche Price in Nigeria, Backup your BB, Track stolen BB, Glo, codes for Glo BIS, Free Apps for BB, Free Apps for Black Berry, How to lock BBM, Pictures, BB Pictures, Blackberry Pictures, Pin Share App for BB, Screen Grabber for BB, BBM Chat, MTN BB service, Airtell, Airtel BIS, Watch DSTV with Blackberry, Nokia Phones, Applications, Social Applications, Mobile Applications, bbmanimated.com, Free BBM Animated Avatars, bloggers guide, Boost Traffic in Blogger, CSS3 in Blogger, Web Design, Audio Player in Blog, Audio player, website, chose Blogging, Guide to BuddyPress, Tips and Resources, Buddy Press, designs, Graphics, facebook tips, facebook updates, wallpapers, Valentine's gift, apps for ipod, Games, PlayStation 4, Kitchen Tools, Gadgets, Cloud Operating System, Free Cloud Operating Systems, PC Tips, Windows Programs, Internet Usage, Cloud Hosting, Backup WhatsApp, Iphone to computer, Repair your PC, Repair your laptop, Tutorials on how to repair your PC yourself, Podcast, seo tools, Publishing, Making money with Affiliate Programs, Free Skype Calls, Sports News, Technology News, Templates, codes, how to create Ajax-Based HTML5, create Gmail logo with CSS3, E-book Readers, E-book Managers, Firefox plugins, how to Protect your computer, CSS Editors, Essential Tools and Applications for Bloggers, Web designing tools, keyboard shortcuts you should know, Table of contents page for Blogger, How to, download tweets, from twitter, Youtube Tutorials, Beginners Guide, and many more...
How to create your First blog - what platform to choose?
https://blogger.googleusercontent.com/img/b/R29vZ2xl/AVvXsEhhUpJQrSrzOtFRi4i8XGn287WRQmflN8mvzNihk0hZ4MINbK_gQLpHJPHUQ0MUBSnhxI9_vL8KsS24g-nylt_J3GgEz7bihkosPiEFnzMhjq__Xe8MA6NhZyfYOHnIwt0tZQbGWenGbDsT/s72-c/keep+calm+and+blog.jpg
View detail
Resolutions For the Bloggers in 2013

Resolutions For the Bloggers in 2013

January 2013 has begun and those of who are into the internet marketing, then this year is going to keep you busy. You might have taken some resolution to improve yourself.


Do you have business resolutions! Have you taken any?


If you are a blogger then do take some resolutions this year, to boost your business level. It may be anything - writing a blog post every day, replying to each of the comments or publish more than 100 guest posts this year.

Well, bloggers we have some good resolutions for you and you can pick anyone of them and stick to it for your own benefit.

5 New Year Resolution Ideas for All Bloggers

Be Unique

If you want to prove yourself successful in the field of blogging then the first thing that you need to earn is a unique personality. Online readers like to see a gravatar, which is unique and refreshing. So, please do not hide your face from the world and give complete details about yourself. Do have a photograph of yourself to increase visibility to your customers.

If you are able to own a personality in the internet market, then public will not take you for granted. Do not ignore the small things like images and photographs. Keep changing them as you do it to your Facebook profile.

Try to integrate Google authorship, as it will help you to get a better CTR from search engines and increase the online identity.

Get Access To Good And Original Topics

What do you mean by good content? Why you need to post them on your blog?

These are the question, which is going to come into your mind as soon as you read the subtitle.

A good content is one that interests a reader and lets the people enjoy the blog posts that they would like to share with their friends on the Internet. Good content requires a lot of research and you have to be patient before creating a blog post.

Information that you relate to the post must be latest and should be valuable to the readers of your site. Do incorporate all the modern technologies to make your content unique from the rest. Just routing posts are not enough; rather you have to excel others. Give something fresh, which readers cannot find in others site.

Keep Posting Daily

Blogs are monsters and you have to feed them constantly, as they are always hungry. So make sure that you post two to three blog contents daily. Make sure the content you post is having a good quality. You have to reach out to the visitors before your competitors reach out to them. The posts you give should be interesting. If you are writing a blog series then post them every day until you finish the series.

Use Social Media To Expand Network

If you can drive proper traffic to your blog then you are fortunate. If not, then one of the ways to drive huge traffic to your blog is to use the social media platforms like Facebook, Twitter, Pinterest etc. Do have a Facebook fan page, create a Google Plus, or Twitter account. With the help of these platforms, you can get thousands of followers for your blog.

You cannot deny the power of social media. Incorporate the social media tabs on your blog to cater large traffic.

Maintain Good Relationship with Your Readers

Blog posting is simple and when you see that your post are attracting readers and they are commenting upon it, do reply each of them. This will enable you to build strong relationship with your customer. As soon as you read their comment, you will come to know what their demands are. And you can provide them with the desirable solutions.

This year does not overlook a single comment; try to have some software on your website that will start debate, discussions, and polls.

If you want to make success kiss your way, then do pick any one of this resolution and turn yourself into a successful blogger.

Do you have new year blogging resolutions? Please, share them via comments.

Cheers!


January 2013 has begun and those of who are into the internet marketing, then this year is going to keep you busy. You might have taken some resolution to improve yourself.


Do you have business resolutions! Have you taken any?


If you are a blogger then do take some resolutions this year, to boost your business level. It may be anything - writing a blog post every day, replying to each of the comments or publish more than 100 guest posts this year.

Well, bloggers we have some good resolutions for you and you can pick anyone of them and stick to it for your own benefit.

5 New Year Resolution Ideas for All Bloggers

Be Unique

If you want to prove yourself successful in the field of blogging then the first thing that you need to earn is a unique personality. Online readers like to see a gravatar, which is unique and refreshing. So, please do not hide your face from the world and give complete details about yourself. Do have a photograph of yourself to increase visibility to your customers.

If you are able to own a personality in the internet market, then public will not take you for granted. Do not ignore the small things like images and photographs. Keep changing them as you do it to your Facebook profile.

Try to integrate Google authorship, as it will help you to get a better CTR from search engines and increase the online identity.

Get Access To Good And Original Topics

What do you mean by good content? Why you need to post them on your blog?

These are the question, which is going to come into your mind as soon as you read the subtitle.

A good content is one that interests a reader and lets the people enjoy the blog posts that they would like to share with their friends on the Internet. Good content requires a lot of research and you have to be patient before creating a blog post.

Information that you relate to the post must be latest and should be valuable to the readers of your site. Do incorporate all the modern technologies to make your content unique from the rest. Just routing posts are not enough; rather you have to excel others. Give something fresh, which readers cannot find in others site.

Keep Posting Daily

Blogs are monsters and you have to feed them constantly, as they are always hungry. So make sure that you post two to three blog contents daily. Make sure the content you post is having a good quality. You have to reach out to the visitors before your competitors reach out to them. The posts you give should be interesting. If you are writing a blog series then post them every day until you finish the series.

Use Social Media To Expand Network

If you can drive proper traffic to your blog then you are fortunate. If not, then one of the ways to drive huge traffic to your blog is to use the social media platforms like Facebook, Twitter, Pinterest etc. Do have a Facebook fan page, create a Google Plus, or Twitter account. With the help of these platforms, you can get thousands of followers for your blog.

You cannot deny the power of social media. Incorporate the social media tabs on your blog to cater large traffic.

Maintain Good Relationship with Your Readers

Blog posting is simple and when you see that your post are attracting readers and they are commenting upon it, do reply each of them. This will enable you to build strong relationship with your customer. As soon as you read their comment, you will come to know what their demands are. And you can provide them with the desirable solutions.

This year does not overlook a single comment; try to have some software on your website that will start debate, discussions, and polls.

If you want to make success kiss your way, then do pick any one of this resolution and turn yourself into a successful blogger.

Do you have new year blogging resolutions? Please, share them via comments.

Cheers!


Resolutions For the Bloggers in 2013
View detail
PUBLISHING SEVERAL POSTS PER DAY BOOST TRAFFIC

PUBLISHING SEVERAL POSTS PER DAY BOOST TRAFFIC


Post-Frequency Today’s post can turn out to be the biggest utopia of your life if you take it seriously and apply it for at least a month. What do webmasters dream of? Obviously Traffic because it is the only tool that brings along all other blessings like success and revenue. Just look around internet and see it for yourself that how many tutorials are written every single day on Traffic tips and tricks where short cuts of driving huge number of visitors to your blogs are shared. Same is true about today’s post but then how come our post today is exceptional? With my small blogging network I have observed some guys like my home buddy Rafay owner of Rafay Hacking Articles and Techlo Tips receiving thousands of visitors within first few months of their blog release. Neither do they advertise their blog nor invest money anywhere else to promote it. So how do they actually do it? I chatted and visited them and then they shared just one simple tip that is the reason behind their huge traffic and subscribers and that simple rule of thumb is “Write More to Earn More!”

Yes the simplest yet the most effective key to the Blogging door of Success is publishing 5-7 posts a day if you are the only author and 10-12 if there are multiple authors. The more posts published per day the better the results. 

How can Good Post Frequency Increase Blog Traffic?

Blog traffic Look around some mega blogs like Tech Crunch and Mashable. They publish several posts per day. One after each 3-5 hours. And that’s why these giants have occupied a great portion of the online traffic. But you can surely achieve that stage with better planning and time management. If you have a good friend circle then you can encourage them to write posts on your blog. After all great number of good articles is what you need to receive your desired traffic.
I have always personally observed my traffic expanding greatly when I post more and more. You might have observed that the traffic Percentage Change goes red in your Google Analytics when you don’t post and goes green again when you start posting actively.

Top 10 Reasons why you must Post Frequently!

This is how this simple yet most effective trick works:
  1. Robots visit blogs periodically depending on how often the blog is updated
  2. The faster a blog updates the faster it is crawled and indexed by Search Engines
  3. Since there is big competition amongst search engines themselves so they always look into more updated content and try their best to provide the searchers with the most up to date content
  4. By posting more your blog becomes an encyclopedia for Google where it can find variety of topics
  5. The smaller your number of posts and posting frequency, the smaller you get in the eyes of search engine robots.
  6. Robots are more like school teachers they love you when you provide them with complete homework on time and they penalize you (lower your ranking) when you turn lazy.
  7. When you post more, your readers will remain active and would often visit your blog and read your feeds. Thus you multiply Pageviews and page impressions. As a result revenue through Ads blossom.
  8. The only thing with which you can beat any competitor is by turning your blog into an Encyclopedia of your selected Topic. Remember the weakest point on a competitors side is always laziness so make his dumbness your strength and burst him with tonnes of articles and grab all his readers and traffic. That is surely legal!
  9. When you update more, your readership would increase because readers would often check back to see if you have something new to share. Subscribers mean a lot!
  10. Frequent updates when shared on Twitter and Facebook will surely expand your followers/ fans list.
 

How To Choose Posting Frequency For Your Blog?

Keep your Blogging goal in your mind and then decide which of the suggestions below best fits your needs:
  • For Rapid Boost Up In Traffic: Publish Several times per day to drive tremendous flow of Traffic. As a rule of thumb posting 3-5 times a day is considered best for Power Bloggers.
  • For Steady Boost Up In Traffic: Publish at least Once a Day.
  • For Slower Boost Up In Traffic: Publish 2-3 times per week. This campaign suits those who blog as a hobby and with no goals in mind. 

So which plan did you choose?

Do let me know how you find this new yet somehow very useful sharing. I would love to know which Post frequency Plan will you adopt to achieve what you always dreamt of. Peace


Post-Frequency Today’s post can turn out to be the biggest utopia of your life if you take it seriously and apply it for at least a month. What do webmasters dream of? Obviously Traffic because it is the only tool that brings along all other blessings like success and revenue. Just look around internet and see it for yourself that how many tutorials are written every single day on Traffic tips and tricks where short cuts of driving huge number of visitors to your blogs are shared. Same is true about today’s post but then how come our post today is exceptional? With my small blogging network I have observed some guys like my home buddy Rafay owner of Rafay Hacking Articles and Techlo Tips receiving thousands of visitors within first few months of their blog release. Neither do they advertise their blog nor invest money anywhere else to promote it. So how do they actually do it? I chatted and visited them and then they shared just one simple tip that is the reason behind their huge traffic and subscribers and that simple rule of thumb is “Write More to Earn More!”
Yes the simplest yet the most effective key to the Blogging door of Success is publishing 5-7 posts a day if you are the only author and 10-12 if there are multiple authors. The more posts published per day the better the results. 

How can Good Post Frequency Increase Blog Traffic?

Blog traffic Look around some mega blogs like Tech Crunch and Mashable. They publish several posts per day. One after each 3-5 hours. And that’s why these giants have occupied a great portion of the online traffic. But you can surely achieve that stage with better planning and time management. If you have a good friend circle then you can encourage them to write posts on your blog. After all great number of good articles is what you need to receive your desired traffic.
I have always personally observed my traffic expanding greatly when I post more and more. You might have observed that the traffic Percentage Change goes red in your Google Analytics when you don’t post and goes green again when you start posting actively.

Top 10 Reasons why you must Post Frequently!

This is how this simple yet most effective trick works:
  1. Robots visit blogs periodically depending on how often the blog is updated
  2. The faster a blog updates the faster it is crawled and indexed by Search Engines
  3. Since there is big competition amongst search engines themselves so they always look into more updated content and try their best to provide the searchers with the most up to date content
  4. By posting more your blog becomes an encyclopedia for Google where it can find variety of topics
  5. The smaller your number of posts and posting frequency, the smaller you get in the eyes of search engine robots.
  6. Robots are more like school teachers they love you when you provide them with complete homework on time and they penalize you (lower your ranking) when you turn lazy.
  7. When you post more, your readers will remain active and would often visit your blog and read your feeds. Thus you multiply Pageviews and page impressions. As a result revenue through Ads blossom.
  8. The only thing with which you can beat any competitor is by turning your blog into an Encyclopedia of your selected Topic. Remember the weakest point on a competitors side is always laziness so make his dumbness your strength and burst him with tonnes of articles and grab all his readers and traffic. That is surely legal!
  9. When you update more, your readership would increase because readers would often check back to see if you have something new to share. Subscribers mean a lot!
  10. Frequent updates when shared on Twitter and Facebook will surely expand your followers/ fans list.
 

How To Choose Posting Frequency For Your Blog?

Keep your Blogging goal in your mind and then decide which of the suggestions below best fits your needs:
  • For Rapid Boost Up In Traffic: Publish Several times per day to drive tremendous flow of Traffic. As a rule of thumb posting 3-5 times a day is considered best for Power Bloggers.
  • For Steady Boost Up In Traffic: Publish at least Once a Day.
  • For Slower Boost Up In Traffic: Publish 2-3 times per week. This campaign suits those who blog as a hobby and with no goals in mind. 

So which plan did you choose?

Do let me know how you find this new yet somehow very useful sharing. I would love to know which Post frequency Plan will you adopt to achieve what you always dreamt of. Peace

PUBLISHING SEVERAL POSTS PER DAY BOOST TRAFFIC
https://blogger.googleusercontent.com/img/b/R29vZ2xl/AVvXsEij7wQZayXl8Ep3cb31SV7yuYBfoSdDWxayBGkJqmSBnLLhtmQTRSIG2k-e5ob-uyiYgq17FoYgKO1te9y-SmdzqkupD2o-CEDbNks1SU8qTBNUDw80aeMg1hQC3u3vfKjiXibsDJC0y10/s72-c/?imgmax=800
View detail
URL REDIRECTION FOR DEMO AND DOWNLOAD LINKS IN BLOGGER

URL REDIRECTION FOR DEMO AND DOWNLOAD LINKS IN BLOGGER

url redirection in bloggerLooks like every time we get a new project from university, we get a new idea to implement it on BlogSpot blogs. Last year we were given the task of developing a twitter clone social media network. We made extensive use of HTML Data-[content] attributes and this led us to create custom Iframes to redirect demo and download links in blogger. Most of twitter's user-interface objects are controlled using this parameter and jQuery built-in functions. We will use the exact same approach to control link redirection in blogger without the need for any web hosting account or complex web scripts. This Blogger plugin is indeed the first of its kind. We just hope this small effort proves useful for all Blogger users especially those who share download resources with their readers.

 
A special thanks to my classmate "Ahmed Nasir" who is a genius programmer without any doubts.
DEMO: Click the Demo and Download links and observe the URL in address bar.
Salahuddin Ayubi

How it works?

Today's tutorial will help you to append all specified outgoing links next to your domain address by using dynamic string concatenation technique. The visitor would feel like he is visiting a new website but your domain URL will remain stick in the address bar.
This plugin will enclose the body layout of your blog with a custom stylesheet specified by the ID "MBT-REDIRECTION". We will then create two static pages. One for Demo page and one for download. Both these pages will contain an iframe tag with vacant source location. Using JavaScript we will inject a custom stylesheet that will cover the entire space between the two body tags. The JavaScript will also make sure no scroll bar appears in the window.
For the concatenation to work the link or button you create must include a Data-[content] attribute. Using Jquery we would pick the href location as string and then concatenate it next to the link of your Demo or download page.
With all that said, lets get to work. Kindly follow the easy steps below:

1. Create Demo and Download Pages

  1. Go To Blogger > Pages
  2. Create a Static Page with title Demo or any name you prefer
  3. Switch to its HTML view mode
  4. Replace the code inside it if any with the following code:
<div height="100%" id="iframe-container" width="100%">
<style>
body { padding: 0!important; background: none!important; }
#iframe-container { overflow: hidden; background: none!important; }
#frame { border: 0; }
</style>
<iframe frameborder="0" id="frame" src="" width="100%"> </iframe>
</div>
<script>
document.documentElement.style.overflow = 'hidden';  // firefox, chrome
document.body.scroll = "no"; // ie only
var query = window.location.search.substring(1);
query = query.replace("url=", "");
$('#frame').attr('src', query);
var str = $('#iframe-container').html();
$('#MBT-REDIRECTION').html(str);
$('iframe').height($(window).height());
</script>
  5.  Now setup up your blogger post editor settings. Click options and then under Line Breaks, choose "Use <br> tag" Hit Done.
post editor options
    6.  Save your page
   7. Now create another page with the title "Download". Repeat the exact same steps from Step#3 - Step#6
Note down the URL address of both these pages. We will use them later.

2. String Concatenation

Now we need to enclose the body tags and add an extra piece of jquery code inside the template that will do remaining half of the magic.
  1. Go To Blogger > Template
  2. Backup your template
  3. Click Edit HTML
  4. Search for <body>  or a similar by searching just <body
  5. Paste the following code just below it:
<div id='MBT-REDIRECTION'>
   6. Next find </body>
   7. Paste the following code just above it:

</div><!--MBT-REDIRECTION ENDS-->
    8. Now search for ]]></b:skin>
    9. Paste the following Jquery code just below it:
<script>
$(document).ready(function() {
$(&#39;[data-MBTdemo]&#39;).click(function(e) {
e.preventDefault();
window.location = &quot;http://www.mybloggertricks.com/p/demo.html?url=&quot; + $(e.srcElement).attr(&#39;href&#39;);
});

$(&#39;[data-MBTdownload]&#39;).click(function(e) {
e.preventDefault();
window.location = &quot;http://www.mybloggertricks.com/p/download.html?url=&quot; + $(e.srcElement).attr(&#39;href&#39;);
});
});
</script>
  • Replace the orange highlighted code with the URL address of your Demo page.
  • Replace the green highlighted code with the URL address of your Download page.
      10.  Save your template and you are all done!

Now if you try visiting your demo and download pages you will find out a blank page with no content inside it. That's what our code does, injecting custom stylesheet by over riding the default template styles.

3. How to create Links?

Now when you have done all the development part of the tutorial, we come to a stage where we will learn to implement the functionality.
You will create links as you normally do and the only extra piece of information that you need to insert in them are the Data-Content attributes. This is how you need to do.
For Demo Link or Demo Button:
<a href="#" rel="nofollow" data-MBTdemo="true">DEMO</a>

For Download Link or Download Button:
<a href="#" rel="nofollow" data-MBTdownload="true">DOWNLOAD</a>
  • Replace the hash symbol (#) with your demo or download link
You can use redirect as many links per page as you want. The code is efficient enough to pick even an array of data-content attributes.  That simple!
You may now redirect any link inside your blog back to your domain address by giving a pro touch!  

Copyrights

The HTML code and all scripts in this tutorial are the sole property of STC Network. You may not sell the plugin nor affiliate the work to your brand. Developers are requested to link back to this page as the only favor in return if they wish to share the plugin with their audience.

Need help?

If you face any trouble while installing the plugin then please let us know. I just hope that this method of redirecting external links in blogger back to the root domain would help all those webmasters who share resources such as, ebooks, wallpapers, templates,. icons etc. You can even use it to redirect affiliate links! Please let us know if you would like further improvements in the code. Wish you a great blogging experience. Peace and blessings buddies :)
 
 
by MybloggerTricks
url redirection in bloggerLooks like every time we get a new project from university, we get a new idea to implement it on BlogSpot blogs. Last year we were given the task of developing a twitter clone social media network. We made extensive use of HTML Data-[content] attributes and this led us to create custom Iframes to redirect demo and download links in blogger. Most of twitter's user-interface objects are controlled using this parameter and jQuery built-in functions. We will use the exact same approach to control link redirection in blogger without the need for any web hosting account or complex web scripts. This Blogger plugin is indeed the first of its kind. We just hope this small effort proves useful for all Blogger users especially those who share download resources with their readers.

 
A special thanks to my classmate "Ahmed Nasir" who is a genius programmer without any doubts.
DEMO: Click the Demo and Download links and observe the URL in address bar.
Salahuddin Ayubi

How it works?

Today's tutorial will help you to append all specified outgoing links next to your domain address by using dynamic string concatenation technique. The visitor would feel like he is visiting a new website but your domain URL will remain stick in the address bar.
This plugin will enclose the body layout of your blog with a custom stylesheet specified by the ID "MBT-REDIRECTION". We will then create two static pages. One for Demo page and one for download. Both these pages will contain an iframe tag with vacant source location. Using JavaScript we will inject a custom stylesheet that will cover the entire space between the two body tags. The JavaScript will also make sure no scroll bar appears in the window.
For the concatenation to work the link or button you create must include a Data-[content] attribute. Using Jquery we would pick the href location as string and then concatenate it next to the link of your Demo or download page.
With all that said, lets get to work. Kindly follow the easy steps below:

1. Create Demo and Download Pages

  1. Go To Blogger > Pages
  2. Create a Static Page with title Demo or any name you prefer
  3. Switch to its HTML view mode
  4. Replace the code inside it if any with the following code:
<div height="100%" id="iframe-container" width="100%">
<style>
body { padding: 0!important; background: none!important; }
#iframe-container { overflow: hidden; background: none!important; }
#frame { border: 0; }
</style>
<iframe frameborder="0" id="frame" src="" width="100%"> </iframe>
</div>
<script>
document.documentElement.style.overflow = 'hidden';  // firefox, chrome
document.body.scroll = "no"; // ie only
var query = window.location.search.substring(1);
query = query.replace("url=", "");
$('#frame').attr('src', query);
var str = $('#iframe-container').html();
$('#MBT-REDIRECTION').html(str);
$('iframe').height($(window).height());
</script>
  5.  Now setup up your blogger post editor settings. Click options and then under Line Breaks, choose "Use <br> tag" Hit Done.
post editor options
    6.  Save your page
   7. Now create another page with the title "Download". Repeat the exact same steps from Step#3 - Step#6
Note down the URL address of both these pages. We will use them later.

2. String Concatenation

Now we need to enclose the body tags and add an extra piece of jquery code inside the template that will do remaining half of the magic.
  1. Go To Blogger > Template
  2. Backup your template
  3. Click Edit HTML
  4. Search for <body>  or a similar by searching just <body
  5. Paste the following code just below it:
<div id='MBT-REDIRECTION'>
   6. Next find </body>
   7. Paste the following code just above it:

</div><!--MBT-REDIRECTION ENDS-->
    8. Now search for ]]></b:skin>
    9. Paste the following Jquery code just below it:
<script>
$(document).ready(function() {
$(&#39;[data-MBTdemo]&#39;).click(function(e) {
e.preventDefault();
window.location = &quot;http://www.mybloggertricks.com/p/demo.html?url=&quot; + $(e.srcElement).attr(&#39;href&#39;);
});

$(&#39;[data-MBTdownload]&#39;).click(function(e) {
e.preventDefault();
window.location = &quot;http://www.mybloggertricks.com/p/download.html?url=&quot; + $(e.srcElement).attr(&#39;href&#39;);
});
});
</script>
  • Replace the orange highlighted code with the URL address of your Demo page.
  • Replace the green highlighted code with the URL address of your Download page.
      10.  Save your template and you are all done!

Now if you try visiting your demo and download pages you will find out a blank page with no content inside it. That's what our code does, injecting custom stylesheet by over riding the default template styles.

3. How to create Links?

Now when you have done all the development part of the tutorial, we come to a stage where we will learn to implement the functionality.
You will create links as you normally do and the only extra piece of information that you need to insert in them are the Data-Content attributes. This is how you need to do.
For Demo Link or Demo Button:
<a href="#" rel="nofollow" data-MBTdemo="true">DEMO</a>

For Download Link or Download Button:
<a href="#" rel="nofollow" data-MBTdownload="true">DOWNLOAD</a>
  • Replace the hash symbol (#) with your demo or download link
You can use redirect as many links per page as you want. The code is efficient enough to pick even an array of data-content attributes.  That simple!
You may now redirect any link inside your blog back to your domain address by giving a pro touch!  

Copyrights

The HTML code and all scripts in this tutorial are the sole property of STC Network. You may not sell the plugin nor affiliate the work to your brand. Developers are requested to link back to this page as the only favor in return if they wish to share the plugin with their audience.

Need help?

If you face any trouble while installing the plugin then please let us know. I just hope that this method of redirecting external links in blogger back to the root domain would help all those webmasters who share resources such as, ebooks, wallpapers, templates,. icons etc. You can even use it to redirect affiliate links! Please let us know if you would like further improvements in the code. Wish you a great blogging experience. Peace and blessings buddies :)
 
 
by MybloggerTricks
URL REDIRECTION FOR DEMO AND DOWNLOAD LINKS IN BLOGGER
https://blogger.googleusercontent.com/img/b/R29vZ2xl/AVvXsEiiEtvPasXtdl5addpLpOWu7sENJUywnXhoASLjWDahX_q-Asi-n4BTckB5_c2dm5hlxV6su-m3TPQx5MhDZBNOtNkD0U0SZe55crILpz-naDZWkUH0ir587gW68d80iY0CrvzbEVFzH_Zj/s72-c/?imgmax=800
View detail
YOU NEED TO "HACK-PROOF" YOUR WEBSITE

YOU NEED TO "HACK-PROOF" YOUR WEBSITE

website hacked label
These days when online earning through blogs and websites is turning into one of the most appealing businesses, there are unavoidable risks of getting your website been hacked. How about malicious content been injected on your website, forcing your readers to never come back to pay a visit? The thought is itself awful, isn’t it? A good news is, Google has lately announced that it has some solutions for those webmasters who are the victim of website hacking.

As I have been saying in my previous posts, Google is smart enough to keep a track of everything, all the time and hence according to the new policies, the site that would be detected as a “hacked website” would be displayed with a warning message “This Site may be compromised”. This has been done to ensure safety of the users who might find the affected site in the search results and find themselves been overloaded with the malicious content.

What makes this news worthy to read is the fact that as a blogger, it is important for you to find whether your blog/website is at risk or not, because in case, it is, then there are wide chances that your website becomes a source to distribute the malicious content among your devoted readers. Moreover, when Google realizes that your site is compromising to facilitate the distribution of malwares, even your site would be having a warning indication in the Google search, affecting your page ranks and your earnings terribly. Therefore, Google has advised all the webmasters to verify their site in Webmaster Tools. Although there are some specific tips for preventing and removing malware from your site, it is still better to be on a safer side to avoid going through a bad phase in business.

A disease can be cured only if you predict it right; however, a dilemma here is that most of the Webmasters do not actually realize when their sites have been infected with the injected malwares. To overcome this, there are two common ways that can help in letting you know that there are malicious third- parties on your website. Let us first see these two ways and then we will talk about how to get your site cleaned from this unwanted mess.

1) Injected Content

As a blogger, you might know by now that what actually these hackers aim for, yes, all they want is to drag your potential traffic to their own sites. One common attempt of doing so is to influence search engines by injecting the links of their sites. This is done way too intelligently where these links are hidden, making their detection difficult by the webmaster. For example, injected malwares appear with your content, making it difficult for the webmaster to identify that he is a victim.

clip_image002

Solution:
Making it easier for you, Google will diagnose all the sites for such injected content, and if your site is one of them, you will receive an e-mail about the notification of this detection. If you would find the content risky, you can then use Fetch as Google tool to check the content of your site.

2) Redirecting Users

There would be hardly anyone who would like to be redirected every time when he visits a site. A good way to hack a site is to redirect its users to malicious sites. This is what the users really hate and might never return to your site in fear of getting redirected again to spammy sites. Again, this can be done in several ways where the hacker might target the viewers who access your site through their mobiles or those who are coming from search engines. It was interesting to find that what actually hackers do. They actually modify the configuration files and serve different users with different contents.

 configuration files
Apart from this, such a hacking can also be done by injecting JavaScript into the source code of your site.

javascripts
Solution:
In order to avoid this, you need to keep a track of your server configuration files for such modifications. For the malicious behavior due to the JavaScript injection, the JavaScript may be designed to hide its purpose, helping terms look like, for example, “eval”, “decode” and “escape”.

Cleanup your Site and Prevent Hacking!

With the two common ways stated above, you can get to know whether your site is compromised or not. If you find your site in risk, then it is necessary to clean it up from the changes that the malwares have brought with them, also preventing your site from getting hacked in future again. You can clean up your site by following the instructions given by Google and prevent such compromises too.

However, you need to consider the sensitivity of the matter and must contact the Google team, informing about your site been compromised. For that you need to submit a reconsideration request after you clean up your site. This is important so that Google can then remove its warning label (indicating you as a compromised site) from its search results.

With that, the post comes to an end, We hope that nothing happens to the sites of our readers, because once affected, it really can bring disastrous outcomes.

Best Wishes.
website hacked label
These days when online earning through blogs and websites is turning into one of the most appealing businesses, there are unavoidable risks of getting your website been hacked. How about malicious content been injected on your website, forcing your readers to never come back to pay a visit? The thought is itself awful, isn’t it? A good news is, Google has lately announced that it has some solutions for those webmasters who are the victim of website hacking.

As I have been saying in my previous posts, Google is smart enough to keep a track of everything, all the time and hence according to the new policies, the site that would be detected as a “hacked website” would be displayed with a warning message “This Site may be compromised”. This has been done to ensure safety of the users who might find the affected site in the search results and find themselves been overloaded with the malicious content.

What makes this news worthy to read is the fact that as a blogger, it is important for you to find whether your blog/website is at risk or not, because in case, it is, then there are wide chances that your website becomes a source to distribute the malicious content among your devoted readers. Moreover, when Google realizes that your site is compromising to facilitate the distribution of malwares, even your site would be having a warning indication in the Google search, affecting your page ranks and your earnings terribly. Therefore, Google has advised all the webmasters to verify their site in Webmaster Tools. Although there are some specific tips for preventing and removing malware from your site, it is still better to be on a safer side to avoid going through a bad phase in business.

A disease can be cured only if you predict it right; however, a dilemma here is that most of the Webmasters do not actually realize when their sites have been infected with the injected malwares. To overcome this, there are two common ways that can help in letting you know that there are malicious third- parties on your website. Let us first see these two ways and then we will talk about how to get your site cleaned from this unwanted mess.

1) Injected Content

As a blogger, you might know by now that what actually these hackers aim for, yes, all they want is to drag your potential traffic to their own sites. One common attempt of doing so is to influence search engines by injecting the links of their sites. This is done way too intelligently where these links are hidden, making their detection difficult by the webmaster. For example, injected malwares appear with your content, making it difficult for the webmaster to identify that he is a victim.

clip_image002

Solution:
Making it easier for you, Google will diagnose all the sites for such injected content, and if your site is one of them, you will receive an e-mail about the notification of this detection. If you would find the content risky, you can then use Fetch as Google tool to check the content of your site.

2) Redirecting Users

There would be hardly anyone who would like to be redirected every time when he visits a site. A good way to hack a site is to redirect its users to malicious sites. This is what the users really hate and might never return to your site in fear of getting redirected again to spammy sites. Again, this can be done in several ways where the hacker might target the viewers who access your site through their mobiles or those who are coming from search engines. It was interesting to find that what actually hackers do. They actually modify the configuration files and serve different users with different contents.

 configuration files
Apart from this, such a hacking can also be done by injecting JavaScript into the source code of your site.

javascripts
Solution:
In order to avoid this, you need to keep a track of your server configuration files for such modifications. For the malicious behavior due to the JavaScript injection, the JavaScript may be designed to hide its purpose, helping terms look like, for example, “eval”, “decode” and “escape”.

Cleanup your Site and Prevent Hacking!

With the two common ways stated above, you can get to know whether your site is compromised or not. If you find your site in risk, then it is necessary to clean it up from the changes that the malwares have brought with them, also preventing your site from getting hacked in future again. You can clean up your site by following the instructions given by Google and prevent such compromises too.

However, you need to consider the sensitivity of the matter and must contact the Google team, informing about your site been compromised. For that you need to submit a reconsideration request after you clean up your site. This is important so that Google can then remove its warning label (indicating you as a compromised site) from its search results.

With that, the post comes to an end, We hope that nothing happens to the sites of our readers, because once affected, it really can bring disastrous outcomes.

Best Wishes.
YOU NEED TO "HACK-PROOF" YOUR WEBSITE
https://blogger.googleusercontent.com/img/b/R29vZ2xl/AVvXsEiM8t_3RKFgltZB-AhgHDF9JNxZqDg6ytQLvN8_qZiXpA8AIT5x-n7CSDDn1RqFXKJ-zkhxn5TGin-OdC58ajaAUlHHyX5_3TbR6BNBXJnyEViod1ziLERgj8ZGrnQXlr18sVfet-awbHg/s72-c/?imgmax=800
View detail
You chose Blogging, I consider Hacking

You chose Blogging, I consider Hacking

An inspiring story by Rafay Baloch from RafayHackingArticles. Brought to you by 1shortnote.com
This article is courtesy of mybloggertricks.com. All rights reserved.

blog or hackWell, this post is not  an ordinary one that talks about "Making Six Figure Income Online" or making millions from blogging, it rather contains some interesting piece of advices for Novice Bloggers and also the Ninjas out there who are struggling hard to survive online.  It all started, when Mohammad and I met back in 2009 in a Snooker Club. We both were interested in blogging and Internet Marketing, so we therefore had arranged a meeting in order to share our existing blogging strategies.

A Challenge that Changed our lives

No work looks interesting unless you are fueled with the requirement amount of passion and motivation. Our meeting did not only increase our learning but set us viral with new online goals that were yet to achieve. We had a long argument about blogging niche. Mohammad was in favor of a niche that was well accepted by Ad networks and that guaranteed great reputation online both in the eyes of search engines and readers. He hated and still hates niches that promote explicit, racial, political and malicious content. Hacking according to him was a topic that could never be accepted online by sponsors, no matter how pure or ethical it may get. To some extent, all that he believed was true and still holds it sanctity. My blog on hacking never succeeded with Adsense, Infolinks or BuySellAds.  So my earning from all these sources were nil despite receiving millions of views per month and with over thousands of readers (23K RSS Readers + 18K Facebook Fans).
On the flip side, my opinion was that one could blog on anything he likes even hacking as long as he know how to market things properly. For me, security related stuff is no less than an addiction. I could not give up with the blog just because Ad networks were not accepting my niche.
Mustafa challenged that I could not make any kind of profit from my hacking blog, On contrary I challenged him that it's not possible to take MBT to the next level with so many Competitors around who are continuously publishing tons of widgets, templates and blogger related tutorials. I also challenged him that your blog will never get below 10k Alexa because it requires a lot of Traffic momentum. I still remember Mohammad's blog was having 100,000 Alexa rank at that time. Mohammad on contrary argued that almost anything could be achieved as long as you serve the blogosphere with something new and fresh. About Alexa, he quoted its all a game of playing with algorithm.
So, we both started working harder to prove our claims. I was earning nothing back in 2009, so I decided to study the strategies used by Six Figure Bloggers to make money online. I subscribed to all the big blogs and read their e-books, here is the interesting part of all of them, they never relied upon Ads! AdSense was never their primary earning source and most of them even didn't even use AdSense. If you observe their blogs [John Chow (Johnchow.com), Darren Rowse (Problogger.net),  Neil Patel (Quick Sprout)], you will find no Google Ads. They work on a more interesting strategy that is no less than a magic ball for many professional bloggers today.

So, How Did They Make Money?


You might be wondering that how do they make Six Figures from their blog without using adsense, Well their are a lot of answers to it. Mainly, they focus on two important things:
1. Building Readership
2. Selling Product.

1. Building A Readership


If you have a good readership you are not at the mercy of  Google, John chow's blog was really affected with Panda and Pengiun, but his earning did not drop, because he had built a strong readership. He has more than 250000 active daily visitors on his blog. Take a look at problogger.net, His blog has more than 168k daily RSS Subscribers, 178k+  twitter followers, so even if Google knocks his blog completely off, he would still make a decent amount of money. That's one reason why Mohammad emphasizes on the importance of Readership so much.

2. Selling The Product


Now all of these Six Figure bloggers have something in common, they have their own product and they are using their readership to market their products, Even if 10% of their readers buy their products, it's enough to make them more than Six figures. Along with it, you would see all these six figure bloggers, market each other's product. Which also explains the idea of co-operation to make more profits.
So, I applied their strategies, I started with Affiliate Marketing, where I sold keyloggers, Spywares to my blog readers, by writing a review about all of them, I chose Clickbank and Plimus as a platform for Affiliate Marketing. I was earning pretty good amount of money each and every month by marketing other  products related to my niche. However, as the competition grew larger, every one started copying our ideas of marketing the same products, I saw a significant drop in my earnings. So I used their second strategy to create my own Product.
Around August 2010, I finished writing my first eBook "A Beginners Guide To Ethical Hacking", and managed to launch it that very month. Next, I used their first strategy of building a readership, i started writing articles frequently and saw a significant increase in my blog's traffic, Next i started interacting with bloggers in my niche, i offered my affiliate program to the people in my niche. To bloggers with significant traffic, I offered them 60% of the share and to small scale bloggers I offered 50% of the share. After few months i had more than 100 affiliates, thus I started earning more!
Along with it, I signed up for advertising networks infolinks.com, chitika.com and sharecash.org, My traffic was more than 24k unique visitors, so I was making a huge profit with them.
But, suddenly things changed, I was struck with Panda effect, My blog's traffic dropped by 60%. I was also banned by infolinks, chitika.com and sharecash.org for serving hacking content. All of them asked me to remove the content, which i couldn't since i worked really hard on them. That's where Mohammad proved right to a bit. And all of sudden i was left at the mercy of my book "A Beginners Guide To Ethical hacking', So i stopped blogging for a month and started working on my new product, "Facebook Hacking Course", I finished it at the end of the month, Since my traffic was not really huge at that time, i did not had that much sales as i expected, but it was decent enough to make me good amount of money at the end of the month.
Next, i decided to write another free book, to convert my blog in to a brand, I wrote "An Introduction to keylogger, RATS And Malware" at the end of the year 2011. I promoted my affiliate products under that book and it worked wonders! That books are my biggest source of earning today along with an additional earning source called "Awards"

The Year 2012


Year 2012 was not a good year for me, I was struck with penguin effect, My traffic dropped again, So, i decided to work on improving my skills. I started writing more and more and on the other hand tried to practice what i learned. Around September 2012, I decided to take part in Bug bounty Programs and responsible disclosure programs of Internationally recognized companies like Microsoft, Ebay, Apple etc. The idea behind it is that you would need to find vulnerabilities in their websites and they would reward you for your discovery by either paying you a bug bounty or either adding you to a responsible disclosure page.
I started with Microsoft and got listed in it's responsible disclosure, The first listing was very difficult but it got easier and easier for me, I managed to get listed in more than 14 responsible disclosure pages within the time span of 3.5 months. Some notable disclosure pages are as follows:
Microsoft Security Researchers Award

I have been Acknowledged by Microsoft three times for findings various vulnerabilities in their websites:
http://technet.microsoft.com/en-us/security/cc308575.aspx (August)
http://technet.microsoft.com/en-us/security/cc308589.aspx (October)
http://technet.microsoft.com/en-us/security/cc308589.aspx (November)
Acknowledgement From Eset Antivirus Company

Dear Mr. Baloch, ESET Security team would like to officially thank for reporting security vulnerabilities on webpage www.eset.tw on October 14, 2012. We acknowledge that Mr. Rafay Baloch, RHA has reported following vulnerabilities: Stored XSS vulnerability SQL injection vulnerability Your information has helped us and our partner responsible for the site to improve security of online services and has prevented malicious exploitation of these vulnerabilities. As a part of official gratitude we would like to provide you license for ESET Smart Security. Please let us know the e-mail address where we can send You the license information.
s pozdravom /
best regards
Daniel Chromek
CISA, CISM, CISSP, MBCI Chief Information Security Officer
Adobe Security Acknowledgments
http://www.adobe.com/support/security/bulletins/securityacknowledgments.html

Ebay Responsible Disclosure Page
Reported an XSS in Ebay, bypassed their security filters to make the vulnerability work:
http://pages.ebay.com/securitycenter/ResearchersAcknowledgement.html
 

$5000 Award from Paypal

Update: The price Reward has been increased to $10,000 now. :)
I started participating in Paypal bug bounty program around the mid of September, I started hunting bugs, at first it got duplicate, however, one day while i was hunting for vulnerabilities  in Paypal, I managed to find a huge vulnerability in Paypal i.e. Remote Code Execution, which managed me to run any command on Paypal's Server.
Initially Paypal has payed me 5000$, along with 1000$ for reporting other vulnerabilities such as XSS and information disclosure. Here is the screenshot:
$5000 Paypal award
Along with it, paypal also offered me job as a security engineer a.k.a Security Ninja, However, I am not planning to work for them at the moment, as my bachelors is currently in progress.
job offer from paypal

So Who Won?

It's the last month of 2012 and around 3 years have passed since we first met. Fortunately neither Mohammad could prove me wrong completely nor I could win over him. He is now running one of the most widely read blogs in Blogging niche with thousands of followers, contributors, resources and amazingly a Google blog that has the highest Alexa Rank i.e 6K out of millions of Google hosted Blogs. MBT is the only unofficial blogger blog with the highest Alexa rank mashAllah. His blog is now DMOZ listed and a repository of hundreds of creative plugins and widgets. He is still a loving friend and a dedicated blogger.
On the other hand, I succeeded in keeping honor of my claim by turning my simple blog into a lucrative Online Income engine. RHA blog is now read widely throughout India, USA and Pakistan. All its earnings are from ebook sales, product reviews and affiliate sales, with not a single Ad from any of the widely renown Contextual Ad networks (AdSense).
I would accept today that hacking wont get you accepted with Adsense or Chitika but if its your only passion and you have a strong belief that your skills can contribute to the online community then just don't stop and give it a go. Search engines do index content generously irrespective of the niche. So blog on anything as long as you know how to market it.

Message To Upcoming Hackers


My message to the ones who have just stepped up in this field is that there is nothing wrong in learn hacking techniques, what makes it wrong is the way you use it. There is a misconception among people that hackers have good jobs overseas, this is all wrong, if you associate the word hacker with your name then no organization will hire you. As they would think that you might be posing risk to their organization. Don't run after fame, it will just be for sometime.
Instead if you are really interested in pursuing your career in information security, I would suggest you to build your skills. Go after some certifications such as CISSP, CEH, CPTE etc. And start using your skills to help organizations make themselves secure, by reporting it to them.

Final Advice


My final advice to every one is not to run after money or fame, It will eventually come to you, Just focus on building your skills. Neither Mohammad nor I blogged for income, what we aimed at was readership. People follow you only when you offer something worth reading. I wish you all the best with your future endeavors and hope that this little post may motivate you to trigger your online journey right today. Jump inside the ring to battle the big giants out there who are still missing a great contender. Leaving you with this beautiful quote. 
Fame is a vapor, popularity an accident, and riches take wings. Only one thing endures and that is character. – Horace Greeley


An inspiring story by Rafay Baloch from RafayHackingArticles. Brought to you by 1shortnote.com
This article is courtesy of mybloggertricks.com. All rights reserved.

blog or hackWell, this post is not  an ordinary one that talks about "Making Six Figure Income Online" or making millions from blogging, it rather contains some interesting piece of advices for Novice Bloggers and also the Ninjas out there who are struggling hard to survive online.  It all started, when Mohammad and I met back in 2009 in a Snooker Club. We both were interested in blogging and Internet Marketing, so we therefore had arranged a meeting in order to share our existing blogging strategies.

A Challenge that Changed our lives

No work looks interesting unless you are fueled with the requirement amount of passion and motivation. Our meeting did not only increase our learning but set us viral with new online goals that were yet to achieve. We had a long argument about blogging niche. Mohammad was in favor of a niche that was well accepted by Ad networks and that guaranteed great reputation online both in the eyes of search engines and readers. He hated and still hates niches that promote explicit, racial, political and malicious content. Hacking according to him was a topic that could never be accepted online by sponsors, no matter how pure or ethical it may get. To some extent, all that he believed was true and still holds it sanctity. My blog on hacking never succeeded with Adsense, Infolinks or BuySellAds.  So my earning from all these sources were nil despite receiving millions of views per month and with over thousands of readers (23K RSS Readers + 18K Facebook Fans).
On the flip side, my opinion was that one could blog on anything he likes even hacking as long as he know how to market things properly. For me, security related stuff is no less than an addiction. I could not give up with the blog just because Ad networks were not accepting my niche.
Mustafa challenged that I could not make any kind of profit from my hacking blog, On contrary I challenged him that it's not possible to take MBT to the next level with so many Competitors around who are continuously publishing tons of widgets, templates and blogger related tutorials. I also challenged him that your blog will never get below 10k Alexa because it requires a lot of Traffic momentum. I still remember Mohammad's blog was having 100,000 Alexa rank at that time. Mohammad on contrary argued that almost anything could be achieved as long as you serve the blogosphere with something new and fresh. About Alexa, he quoted its all a game of playing with algorithm.
So, we both started working harder to prove our claims. I was earning nothing back in 2009, so I decided to study the strategies used by Six Figure Bloggers to make money online. I subscribed to all the big blogs and read their e-books, here is the interesting part of all of them, they never relied upon Ads! AdSense was never their primary earning source and most of them even didn't even use AdSense. If you observe their blogs [John Chow (Johnchow.com), Darren Rowse (Problogger.net),  Neil Patel (Quick Sprout)], you will find no Google Ads. They work on a more interesting strategy that is no less than a magic ball for many professional bloggers today.

So, How Did They Make Money?


You might be wondering that how do they make Six Figures from their blog without using adsense, Well their are a lot of answers to it. Mainly, they focus on two important things:
1. Building Readership
2. Selling Product.

1. Building A Readership


If you have a good readership you are not at the mercy of  Google, John chow's blog was really affected with Panda and Pengiun, but his earning did not drop, because he had built a strong readership. He has more than 250000 active daily visitors on his blog. Take a look at problogger.net, His blog has more than 168k daily RSS Subscribers, 178k+  twitter followers, so even if Google knocks his blog completely off, he would still make a decent amount of money. That's one reason why Mohammad emphasizes on the importance of Readership so much.

2. Selling The Product


Now all of these Six Figure bloggers have something in common, they have their own product and they are using their readership to market their products, Even if 10% of their readers buy their products, it's enough to make them more than Six figures. Along with it, you would see all these six figure bloggers, market each other's product. Which also explains the idea of co-operation to make more profits.
So, I applied their strategies, I started with Affiliate Marketing, where I sold keyloggers, Spywares to my blog readers, by writing a review about all of them, I chose Clickbank and Plimus as a platform for Affiliate Marketing. I was earning pretty good amount of money each and every month by marketing other  products related to my niche. However, as the competition grew larger, every one started copying our ideas of marketing the same products, I saw a significant drop in my earnings. So I used their second strategy to create my own Product.
Around August 2010, I finished writing my first eBook "A Beginners Guide To Ethical Hacking", and managed to launch it that very month. Next, I used their first strategy of building a readership, i started writing articles frequently and saw a significant increase in my blog's traffic, Next i started interacting with bloggers in my niche, i offered my affiliate program to the people in my niche. To bloggers with significant traffic, I offered them 60% of the share and to small scale bloggers I offered 50% of the share. After few months i had more than 100 affiliates, thus I started earning more!
Along with it, I signed up for advertising networks infolinks.com, chitika.com and sharecash.org, My traffic was more than 24k unique visitors, so I was making a huge profit with them.
But, suddenly things changed, I was struck with Panda effect, My blog's traffic dropped by 60%. I was also banned by infolinks, chitika.com and sharecash.org for serving hacking content. All of them asked me to remove the content, which i couldn't since i worked really hard on them. That's where Mohammad proved right to a bit. And all of sudden i was left at the mercy of my book "A Beginners Guide To Ethical hacking', So i stopped blogging for a month and started working on my new product, "Facebook Hacking Course", I finished it at the end of the month, Since my traffic was not really huge at that time, i did not had that much sales as i expected, but it was decent enough to make me good amount of money at the end of the month.
Next, i decided to write another free book, to convert my blog in to a brand, I wrote "An Introduction to keylogger, RATS And Malware" at the end of the year 2011. I promoted my affiliate products under that book and it worked wonders! That books are my biggest source of earning today along with an additional earning source called "Awards"

The Year 2012


Year 2012 was not a good year for me, I was struck with penguin effect, My traffic dropped again, So, i decided to work on improving my skills. I started writing more and more and on the other hand tried to practice what i learned. Around September 2012, I decided to take part in Bug bounty Programs and responsible disclosure programs of Internationally recognized companies like Microsoft, Ebay, Apple etc. The idea behind it is that you would need to find vulnerabilities in their websites and they would reward you for your discovery by either paying you a bug bounty or either adding you to a responsible disclosure page.
I started with Microsoft and got listed in it's responsible disclosure, The first listing was very difficult but it got easier and easier for me, I managed to get listed in more than 14 responsible disclosure pages within the time span of 3.5 months. Some notable disclosure pages are as follows:
Microsoft Security Researchers Award

I have been Acknowledged by Microsoft three times for findings various vulnerabilities in their websites:
http://technet.microsoft.com/en-us/security/cc308575.aspx (August)
http://technet.microsoft.com/en-us/security/cc308589.aspx (October)
http://technet.microsoft.com/en-us/security/cc308589.aspx (November)
Acknowledgement From Eset Antivirus Company

Dear Mr. Baloch, ESET Security team would like to officially thank for reporting security vulnerabilities on webpage www.eset.tw on October 14, 2012. We acknowledge that Mr. Rafay Baloch, RHA has reported following vulnerabilities: Stored XSS vulnerability SQL injection vulnerability Your information has helped us and our partner responsible for the site to improve security of online services and has prevented malicious exploitation of these vulnerabilities. As a part of official gratitude we would like to provide you license for ESET Smart Security. Please let us know the e-mail address where we can send You the license information.
s pozdravom /
best regards
Daniel Chromek
CISA, CISM, CISSP, MBCI Chief Information Security Officer
Adobe Security Acknowledgments
http://www.adobe.com/support/security/bulletins/securityacknowledgments.html

Ebay Responsible Disclosure Page
Reported an XSS in Ebay, bypassed their security filters to make the vulnerability work:
http://pages.ebay.com/securitycenter/ResearchersAcknowledgement.html
 

$5000 Award from Paypal

Update: The price Reward has been increased to $10,000 now. :)
I started participating in Paypal bug bounty program around the mid of September, I started hunting bugs, at first it got duplicate, however, one day while i was hunting for vulnerabilities  in Paypal, I managed to find a huge vulnerability in Paypal i.e. Remote Code Execution, which managed me to run any command on Paypal's Server.
Initially Paypal has payed me 5000$, along with 1000$ for reporting other vulnerabilities such as XSS and information disclosure. Here is the screenshot:
$5000 Paypal award
Along with it, paypal also offered me job as a security engineer a.k.a Security Ninja, However, I am not planning to work for them at the moment, as my bachelors is currently in progress.
job offer from paypal

So Who Won?

It's the last month of 2012 and around 3 years have passed since we first met. Fortunately neither Mohammad could prove me wrong completely nor I could win over him. He is now running one of the most widely read blogs in Blogging niche with thousands of followers, contributors, resources and amazingly a Google blog that has the highest Alexa Rank i.e 6K out of millions of Google hosted Blogs. MBT is the only unofficial blogger blog with the highest Alexa rank mashAllah. His blog is now DMOZ listed and a repository of hundreds of creative plugins and widgets. He is still a loving friend and a dedicated blogger.
On the other hand, I succeeded in keeping honor of my claim by turning my simple blog into a lucrative Online Income engine. RHA blog is now read widely throughout India, USA and Pakistan. All its earnings are from ebook sales, product reviews and affiliate sales, with not a single Ad from any of the widely renown Contextual Ad networks (AdSense).
I would accept today that hacking wont get you accepted with Adsense or Chitika but if its your only passion and you have a strong belief that your skills can contribute to the online community then just don't stop and give it a go. Search engines do index content generously irrespective of the niche. So blog on anything as long as you know how to market it.

Message To Upcoming Hackers


My message to the ones who have just stepped up in this field is that there is nothing wrong in learn hacking techniques, what makes it wrong is the way you use it. There is a misconception among people that hackers have good jobs overseas, this is all wrong, if you associate the word hacker with your name then no organization will hire you. As they would think that you might be posing risk to their organization. Don't run after fame, it will just be for sometime.
Instead if you are really interested in pursuing your career in information security, I would suggest you to build your skills. Go after some certifications such as CISSP, CEH, CPTE etc. And start using your skills to help organizations make themselves secure, by reporting it to them.

Final Advice


My final advice to every one is not to run after money or fame, It will eventually come to you, Just focus on building your skills. Neither Mohammad nor I blogged for income, what we aimed at was readership. People follow you only when you offer something worth reading. I wish you all the best with your future endeavors and hope that this little post may motivate you to trigger your online journey right today. Jump inside the ring to battle the big giants out there who are still missing a great contender. Leaving you with this beautiful quote. 
Fame is a vapor, popularity an accident, and riches take wings. Only one thing endures and that is character. – Horace Greeley


You chose Blogging, I consider Hacking
https://blogger.googleusercontent.com/img/b/R29vZ2xl/AVvXsEjuyk7neDKi_Ab87sua04anhlkS69i-F5YqNtCqvLK45Q1Fie21O5XsZaGYeX-9CWWmoVnK7z-_Y2GhyphenhyphenEHSG846-5wQuY2-1qsZ_pTcdaufp05GI6DQYECCzjJd-TIA-2VrUpsvIrCLnxki/s72-c/?imgmax=800
View detail
Animation using CSS3 KeyFrames and jQuery's scrollTop() function

Animation using CSS3 KeyFrames and jQuery's scrollTop() function


css3 keyframes
Jquery is indeed the most compressed and efficient library of JavaScript introduced so far that has made a web developer's job more easy. Its built in functions of show(), hide(), AJAX() and my beloved scrollTop() are indeed the most used functions that gives a new life to user interface (UI). CSS3 animations using @Keyframes rule is one of the most innovative things I came across so far. Pseudo elements such as :before and :after are increasingly being used now because they eliminated the use of unnecessary div tags.

These days since  I am on vocations I am trying to improve skills of both Jquery and CSS3. From the combination of beautiful web tricks that I learnt so far, I managed to design a simple scroll to top button that uses JQuery's scrollTop function to produce smooth scrolling and is spiced up with CSS3 effects to make it stand out. I have created just two sample versions with circular and rectangular shapes. The Styles are extremely easy to be customized. Lets first see a demo for the circular one:

Live Demo

How to add it to Blogger?

  1. Go To Blogger > Template
  2. Back up your template
  3. Click Edit HTML
  4. Search for <head>
  5. Just below it paste the following scripts:
<script src='http://ajax.googleapis.com/ajax/libs/jquery/1/jquery.min.js' type='text/javascript'/>
<script src='http://downloads.mybloggertricks.com/scrolltop.js' type='text/javascript'/>
Note: I have included the dynamic link for jquery so you wont need to update it when a new version of Jquery is released. It will update automatically.
   6.  Now Search for ]]></b:skin>
   7. Just above it paste one of the following styles
For circular one use this code:
/* ----- MBT's Back-To-Top Button Circular version -----*/
@-webkit-keyframes arrow_to_top{
    0%{
        top:10px
    }
    50%{
        top:5px
    }
    100%{
        top:10px
    }
}
@-moz-keyframes arrow_to_top{
    0%{
        top:10px
    }
    50%{
        top:5px
    }
    100%{
        top:10px
    }
}
@keyframes arrow_to_top{
    0%{
        top:10px
    }
    50%{
        top:5px
    }
    100%{
        top:10px
    }
}
#back-top, #back-top:hover{
    position: fixed;
    display:block;
    display:none;
    bottom: 20px;
    right:20px;
    cursor:pointer;
    width: 52px;
    height:52px;
    text-align: center;
    text-decoration: none;
    color: #797e82;
    color: rgba(100,100,100,0.8);
    font-size:16px;
    border:1px solid #c5ccd3;
    border-radius:30px;     z-index:9999;
    padding-top:35px;
    -webkit-box-sizing: border-box; 
    -moz-box-sizing: border-box;    
    box-sizing: border-box;             
    background: #dee1e7;
    background: rgba(208,215,222,0.5);
}
   
   
#back-top:hover{
    color:#000;
    text-shadow:1px 1px 0 #fff;
    background: #d0d7de;
    background: rgba(208,215,222,0.9);
    border-color:#8fa8c1;
}
#back-top:before{
    display:block;
    content:"";
    position:absolute;
    z-index:998;
    background: #e2e3e6;
    background: rgba(222,225,231,0.3);
    width: 66px;
    height:66px;
    border-radius:35px;     border:1px solid #c5ccd3;
    top:-9px;
    left:-9px
}
#back-top:hover:before{
    border-color:#8fa8c1
}
#back-top:after{
    display:block;
    content:"";
    position:absolute;
    z-index:10000;
    background: url(https://blogger.googleusercontent.com/img/b/R29vZ2xl/AVvXsEi-xEQ7A9PJkgpmzFNwRSHY1oPMOnhQ28XZUsMkKRO8jqC70nWTi492MIoj5GuGUTD4hDU1rEtp7xCE5blDOsa5axikWKlwk-A3fcBvjVFx4BcQU3Q-6cfT4smNvnnavrjJZKSllTnWhCES/s400/sprite-mbt.png) -10px -5px no-repeat;
    opacity:0.5;
    width: 10px;
    height:23px;
    top:10px;
    left:50%;
    margin-left:-5px;
}
#back-top, #back-top:after, #back-top:before{
    -webkit-transition: 0.5s;
    -moz-transition: 0.5s;
    -o-transition: 0.5s;
    -ms-transition: 0.5s;
    transition: 0.5s;
}
#back-top:hover:after{
    opacity:1;
    -moz-animation-duration: .5s;
    -moz-animation-iteration-count: infinite;
    -moz-animation-name: arrow_to_top;
    -moz-animation-timing-function: linear;
    -webkit-animation-duration: .5s;
    -webkit-animation-iteration-count: infinite;
    -webkit-animation-name: arrow_to_top;
    -webkit-animation-timing-function: linear;
    animation-duration: .5s;
    animation-iteration-count: infinite;
    animation-name: arrow_to_top;
    animation-timing-function: linear;
}
For Rectangular one use this code:

/* ----- MBT's Back-To-Top Button Rectangular version -----*/
@-webkit-keyframes arrow_to_top{
    0%{
        top:10px
    }
    50%{
        top:5px
    }
    100%{
        top:10px
    }
}
@-moz-keyframes arrow_to_top{
    0%{
        top:10px
    }
    50%{
        top:5px
    }
    100%{
        top:10px
    }
}
@keyframes arrow_to_top{
    0%{
        top:10px
    }
    50%{
        top:5px
    }
    100%{
        top:10px
    }
}
#back-top, #back-top:hover{
    position: fixed;
    display:block;
    display:none;
    bottom: 20px;
    right:0px;
    cursor:pointer;
    width: 24px;
    height:34px;
    text-align: center;
    text-decoration: none;
    color: #797e82;
    color: rgba(100,100,100,0.8);
    font-size:16px;
    border:1px solid #c5ccd3;
    border-radius:2px;
    z-index:9999;
    padding-top:35px;
    -webkit-box-sizing: border-box; /* Safari/Chrome, other WebKit */
    -moz-box-sizing: border-box;    /* Firefox, other Gecko */
    box-sizing: border-box;         /* Opera/IE 8+ */
    margin:0px;
    background: #dee1e7;
    background: rgba(208,215,222,0.5);
}

#back-top:hover{
    color:#000;
    text-shadow:1px 1px 0 #fff;
    background: #d0d7de;
    background: rgba(208,215,222,0.9);
    border-color:#8fa8c1;
}
#back-top:before{
    display:block;
    content:"";
    position:absolute;
    z-index:998;
    background: #e2e3e6;
    background: rgba(222,225,231,0.3);
    width: 37px;
    height:50px;
    border-radius:2px;
    border:1px solid #c5ccd3;
    top:-9px;
    left:-9px
}
#back-top:hover:before{
    border-color:#8fa8c1
}
#back-top:after{
    display:block;
    content:"";
    position:absolute;
    z-index:10000;
    background: url(https://blogger.googleusercontent.com/img/b/R29vZ2xl/AVvXsEi-xEQ7A9PJkgpmzFNwRSHY1oPMOnhQ28XZUsMkKRO8jqC70nWTi492MIoj5GuGUTD4hDU1rEtp7xCE5blDOsa5axikWKlwk-A3fcBvjVFx4BcQU3Q-6cfT4smNvnnavrjJZKSllTnWhCES/s400/sprite-mbt.png) -10px -5px no-repeat;
    opacity:0.5;
    width: 10px;
    height:23px;
    top:7px;
    left:50%;
    margin-left:-5px;
}
#back-top, #back-top:after, #back-top:before{
    -webkit-transition: 0.5s;
    -moz-transition: 0.5s;
    -o-transition: 0.5s;
    -ms-transition: 0.5s;
    transition: 0.5s;
}
#back-top:hover:after{
    opacity:1;
    -moz-animation-duration: .5s;
    -moz-animation-iteration-count: infinite;
    -moz-animation-name: arrow_to_top;
    -moz-animation-timing-function: linear;
    -webkit-animation-duration: .5s;
    -webkit-animation-iteration-count: infinite;
    -webkit-animation-name: arrow_to_top;
    -webkit-animation-timing-function: linear;
    animation-duration: .5s;
    animation-iteration-count: infinite;
    animation-name: arrow_to_top;
    animation-timing-function: linear;
}

        8.   Now just one last step. Paste the following HTML code just below <body>

<a href='#top' id='back-top' style='right:0px; display: inline;'/>
Tip: Play with border-radius property to design more creative shapes yourself!
       9.    Save your template and you are all done!
Visit your blog and scroll to bottom to see it working just fine!

How it works?

The script shows and hides the button based on the position of the window. As soon as the user scrolls down, the script will activate the button through .show() function and as soon as the user moves up, the button disappears due to activation of .Hide() function. The soft fading effect also depends on the inner width of the window (i.e 1600px and 812px) and button location. The effects are introduced using simple Jquery built-in functions of fadeIn() and fadeOut().
The button will display to the bottom right corner of the page.
The opacity in button's background colors is introduced using rgba colors. Where thanks to the alpha channel the opacity of the object is easily controlled without introducing a separate property for it. In order to avoid IE's opacity issues I have included a separate property for background color using rgb settings. So the button would look the same in all browsers. However since IE does not support Keyframes animation, therefore the arrow wont animate in IE alone.

Questions?

I just hope this little object may help in adding a new spice to your blog's appearance. If you have any problems installing the widget, just post me a query. If you carefully observe the stylesheet & the scrolltop.js script for this widget, you will be able to learn almost everything about CSS3 and JQuery's widely used functions. Wish you great health and peace buddies.

css3 keyframes
Jquery is indeed the most compressed and efficient library of JavaScript introduced so far that has made a web developer's job more easy. Its built in functions of show(), hide(), AJAX() and my beloved scrollTop() are indeed the most used functions that gives a new life to user interface (UI). CSS3 animations using @Keyframes rule is one of the most innovative things I came across so far. Pseudo elements such as :before and :after are increasingly being used now because they eliminated the use of unnecessary div tags.

These days since  I am on vocations I am trying to improve skills of both Jquery and CSS3. From the combination of beautiful web tricks that I learnt so far, I managed to design a simple scroll to top button that uses JQuery's scrollTop function to produce smooth scrolling and is spiced up with CSS3 effects to make it stand out. I have created just two sample versions with circular and rectangular shapes. The Styles are extremely easy to be customized. Lets first see a demo for the circular one:

Live Demo

How to add it to Blogger?

  1. Go To Blogger > Template
  2. Back up your template
  3. Click Edit HTML
  4. Search for <head>
  5. Just below it paste the following scripts:
<script src='http://ajax.googleapis.com/ajax/libs/jquery/1/jquery.min.js' type='text/javascript'/>
<script src='http://downloads.mybloggertricks.com/scrolltop.js' type='text/javascript'/>
Note: I have included the dynamic link for jquery so you wont need to update it when a new version of Jquery is released. It will update automatically.
   6.  Now Search for ]]></b:skin>
   7. Just above it paste one of the following styles
For circular one use this code:
/* ----- MBT's Back-To-Top Button Circular version -----*/
@-webkit-keyframes arrow_to_top{
    0%{
        top:10px
    }
    50%{
        top:5px
    }
    100%{
        top:10px
    }
}
@-moz-keyframes arrow_to_top{
    0%{
        top:10px
    }
    50%{
        top:5px
    }
    100%{
        top:10px
    }
}
@keyframes arrow_to_top{
    0%{
        top:10px
    }
    50%{
        top:5px
    }
    100%{
        top:10px
    }
}
#back-top, #back-top:hover{
    position: fixed;
    display:block;
    display:none;
    bottom: 20px;
    right:20px;
    cursor:pointer;
    width: 52px;
    height:52px;
    text-align: center;
    text-decoration: none;
    color: #797e82;
    color: rgba(100,100,100,0.8);
    font-size:16px;
    border:1px solid #c5ccd3;
    border-radius:30px;     z-index:9999;
    padding-top:35px;
    -webkit-box-sizing: border-box; 
    -moz-box-sizing: border-box;    
    box-sizing: border-box;             
    background: #dee1e7;
    background: rgba(208,215,222,0.5);
}
   
   
#back-top:hover{
    color:#000;
    text-shadow:1px 1px 0 #fff;
    background: #d0d7de;
    background: rgba(208,215,222,0.9);
    border-color:#8fa8c1;
}
#back-top:before{
    display:block;
    content:"";
    position:absolute;
    z-index:998;
    background: #e2e3e6;
    background: rgba(222,225,231,0.3);
    width: 66px;
    height:66px;
    border-radius:35px;     border:1px solid #c5ccd3;
    top:-9px;
    left:-9px
}
#back-top:hover:before{
    border-color:#8fa8c1
}
#back-top:after{
    display:block;
    content:"";
    position:absolute;
    z-index:10000;
    background: url(https://blogger.googleusercontent.com/img/b/R29vZ2xl/AVvXsEi-xEQ7A9PJkgpmzFNwRSHY1oPMOnhQ28XZUsMkKRO8jqC70nWTi492MIoj5GuGUTD4hDU1rEtp7xCE5blDOsa5axikWKlwk-A3fcBvjVFx4BcQU3Q-6cfT4smNvnnavrjJZKSllTnWhCES/s400/sprite-mbt.png) -10px -5px no-repeat;
    opacity:0.5;
    width: 10px;
    height:23px;
    top:10px;
    left:50%;
    margin-left:-5px;
}
#back-top, #back-top:after, #back-top:before{
    -webkit-transition: 0.5s;
    -moz-transition: 0.5s;
    -o-transition: 0.5s;
    -ms-transition: 0.5s;
    transition: 0.5s;
}
#back-top:hover:after{
    opacity:1;
    -moz-animation-duration: .5s;
    -moz-animation-iteration-count: infinite;
    -moz-animation-name: arrow_to_top;
    -moz-animation-timing-function: linear;
    -webkit-animation-duration: .5s;
    -webkit-animation-iteration-count: infinite;
    -webkit-animation-name: arrow_to_top;
    -webkit-animation-timing-function: linear;
    animation-duration: .5s;
    animation-iteration-count: infinite;
    animation-name: arrow_to_top;
    animation-timing-function: linear;
}
For Rectangular one use this code:

/* ----- MBT's Back-To-Top Button Rectangular version -----*/
@-webkit-keyframes arrow_to_top{
    0%{
        top:10px
    }
    50%{
        top:5px
    }
    100%{
        top:10px
    }
}
@-moz-keyframes arrow_to_top{
    0%{
        top:10px
    }
    50%{
        top:5px
    }
    100%{
        top:10px
    }
}
@keyframes arrow_to_top{
    0%{
        top:10px
    }
    50%{
        top:5px
    }
    100%{
        top:10px
    }
}
#back-top, #back-top:hover{
    position: fixed;
    display:block;
    display:none;
    bottom: 20px;
    right:0px;
    cursor:pointer;
    width: 24px;
    height:34px;
    text-align: center;
    text-decoration: none;
    color: #797e82;
    color: rgba(100,100,100,0.8);
    font-size:16px;
    border:1px solid #c5ccd3;
    border-radius:2px;
    z-index:9999;
    padding-top:35px;
    -webkit-box-sizing: border-box; /* Safari/Chrome, other WebKit */
    -moz-box-sizing: border-box;    /* Firefox, other Gecko */
    box-sizing: border-box;         /* Opera/IE 8+ */
    margin:0px;
    background: #dee1e7;
    background: rgba(208,215,222,0.5);
}

#back-top:hover{
    color:#000;
    text-shadow:1px 1px 0 #fff;
    background: #d0d7de;
    background: rgba(208,215,222,0.9);
    border-color:#8fa8c1;
}
#back-top:before{
    display:block;
    content:"";
    position:absolute;
    z-index:998;
    background: #e2e3e6;
    background: rgba(222,225,231,0.3);
    width: 37px;
    height:50px;
    border-radius:2px;
    border:1px solid #c5ccd3;
    top:-9px;
    left:-9px
}
#back-top:hover:before{
    border-color:#8fa8c1
}
#back-top:after{
    display:block;
    content:"";
    position:absolute;
    z-index:10000;
    background: url(https://blogger.googleusercontent.com/img/b/R29vZ2xl/AVvXsEi-xEQ7A9PJkgpmzFNwRSHY1oPMOnhQ28XZUsMkKRO8jqC70nWTi492MIoj5GuGUTD4hDU1rEtp7xCE5blDOsa5axikWKlwk-A3fcBvjVFx4BcQU3Q-6cfT4smNvnnavrjJZKSllTnWhCES/s400/sprite-mbt.png) -10px -5px no-repeat;
    opacity:0.5;
    width: 10px;
    height:23px;
    top:7px;
    left:50%;
    margin-left:-5px;
}
#back-top, #back-top:after, #back-top:before{
    -webkit-transition: 0.5s;
    -moz-transition: 0.5s;
    -o-transition: 0.5s;
    -ms-transition: 0.5s;
    transition: 0.5s;
}
#back-top:hover:after{
    opacity:1;
    -moz-animation-duration: .5s;
    -moz-animation-iteration-count: infinite;
    -moz-animation-name: arrow_to_top;
    -moz-animation-timing-function: linear;
    -webkit-animation-duration: .5s;
    -webkit-animation-iteration-count: infinite;
    -webkit-animation-name: arrow_to_top;
    -webkit-animation-timing-function: linear;
    animation-duration: .5s;
    animation-iteration-count: infinite;
    animation-name: arrow_to_top;
    animation-timing-function: linear;
}

        8.   Now just one last step. Paste the following HTML code just below <body>

<a href='#top' id='back-top' style='right:0px; display: inline;'/>
Tip: Play with border-radius property to design more creative shapes yourself!
       9.    Save your template and you are all done!
Visit your blog and scroll to bottom to see it working just fine!

How it works?

The script shows and hides the button based on the position of the window. As soon as the user scrolls down, the script will activate the button through .show() function and as soon as the user moves up, the button disappears due to activation of .Hide() function. The soft fading effect also depends on the inner width of the window (i.e 1600px and 812px) and button location. The effects are introduced using simple Jquery built-in functions of fadeIn() and fadeOut().
The button will display to the bottom right corner of the page.
The opacity in button's background colors is introduced using rgba colors. Where thanks to the alpha channel the opacity of the object is easily controlled without introducing a separate property for it. In order to avoid IE's opacity issues I have included a separate property for background color using rgb settings. So the button would look the same in all browsers. However since IE does not support Keyframes animation, therefore the arrow wont animate in IE alone.

Questions?

I just hope this little object may help in adding a new spice to your blog's appearance. If you have any problems installing the widget, just post me a query. If you carefully observe the stylesheet & the scrolltop.js script for this widget, you will be able to learn almost everything about CSS3 and JQuery's widely used functions. Wish you great health and peace buddies.
Animation using CSS3 KeyFrames and jQuery's scrollTop() function
https://blogger.googleusercontent.com/img/b/R29vZ2xl/AVvXsEj5eeXqnmElxxenw7jRS13SL-tktMHmGUD4rvLEMTR8hVjCgAkhgXgtXbOGidPlP8GNWMMTnZJ2asDsXcdQSRfyEazDU0nRU2MOZgX_DND4cUZAlH0hHQrMiw6dNj08pN_JQHBSImx6E5k/s72-c/?imgmax=800
View detail
 
Support : Creating Website | Johny Template | Mas Template
Copyright © 2011. WELCOME TO CFATMUSIC BLOG - All Rights Reserved
Template Created by Creating Website Published by Mas Template
Proudly powered by Blogger
